
Step-by-Step Guide to Adding SSL Certificates
Adding an SSL certificate involves obtaining a certificate for your domain, installing it on the server that handles HTTPS, and checking that visitors receive a trusted, encrypted connection. Your hosting provider may automate the process, while a self-managed server requires more configuration. This guide explains both routes, including domain validation, installation, testing, and renewal. (letsencrypt.org)
How do you install an SSL certificate on a website?
To install an SSL certificate on a website, first check whether your host offers managed certificates. If it does, enable the service for your domain; otherwise, obtain a certificate from a certificate authority, complete domain validation, and install the certificate alongside its matching private key and required intermediate certificates. Then verify HTTPS before redirecting HTTP traffic. (letsencrypt.org)
Although “SSL certificate” remains the familiar term, modern HTTPS connections use TLS. The certificate helps authenticate the server, while TLS protects data in transit; it does not replace website updates, secure passwords, or application security. (cyber.gov.au)
The important distinction is issuance versus installation. Generating or downloading a certificate does not necessarily make your website serve HTTPS. The server must actually be configured to use it. (eff-certbot.readthedocs.io)
Step 1: Identify your hosting setup and prepare
Before changing anything, identify who manages your web server. A hosting dashboard and a self-managed server require different workflows, so avoid following server commands simply because a tutorial includes them. Let’s Encrypt recommends establishing whether your provider manages certificates before choosing an ACME client yourself. (letsencrypt.org)
Prepare this checklist:
- Domain coverage: List every hostname visitors use, including the main domain, www, and relevant subdomains.
- Access: Confirm you can access the hosting dashboard or administer the server, plus edit DNS if your validation method requires it.
- Recovery: Back up the website and existing configuration before making changes.
- Ownership: Decide who will monitor expiry and maintain the renewal process.
Certificate selection, validation, installation, and renewal all depend on these details. Resolving them first helps you avoid requesting a certificate that omits a needed hostname or choosing a validation method you cannot complete. (eff-certbot.readthedocs.io)
Step 2: Choose how to obtain your certificate
Start with your host’s managed HTTPS option when available. This can reduce manual certificate handling, but confirm whether the service includes renewal and deployment rather than assuming that “SSL enabled” covers ongoing maintenance. If you manage the server, an ACME client such as Certbot can obtain certificates and, with supported integrations, install them. (letsencrypt.org)
Choose coverage based on actual hostnames. For example, request both example.com and www.example.com if visitors use both. A wildcard certificate serves a different purpose: covering matching subdomains. Let’s Encrypt requires DNS validation for wildcard issuance. (eff-certbot.readthedocs.io)
If you are researching how to apply SSL certificate protection, choose the installation route before downloading files. A managed platform may handle everything, while a manual workflow needs certificate files and the corresponding private key. (letsencrypt.org)
WordPress certificate generation with WP Encryption
If you need SSL certificate for a WordPress site – Install and run the “SSL Install Form” of “WP Encryption“(https://wordpress.org/plugins/wp-letsencrypt-ssl/) WordPress plugin to generate free SSL certificate directly within your WordPress dashboard.
WP Encryption’s listing describes domain verification, free certificate generation, and downloads for the certificate, key, and intermediate files. Generating those files is distinct from deploying them on your hosting server, so follow the plugin’s instructions for your hosting setup. (wordpress.org)
Step 3: Validate control of your domain
The certificate authority must verify that you control each requested domain. With Let’s Encrypt, the two common approaches are HTTP validation and DNS validation; your hosting service or ACME client may perform the challenge automatically. (letsencrypt.org)
HTTP validation places a challenge file on your website for the authority to retrieve. Let’s Encrypt’s HTTP-01 challenge uses port 80, so blocked access or an unreachable challenge file can prevent issuance. If you use several web servers, the challenge must be available wherever validation requests arrive. (letsencrypt.org)
DNS validation requires a specific TXT record under the domain’s _acme-challenge name. Enter the supplied value through your DNS provider, allow the change to become publicly available, and then continue validation. For automated DNS validation, use narrowly scoped API credentials rather than unnecessarily broad account access. (letsencrypt.org)
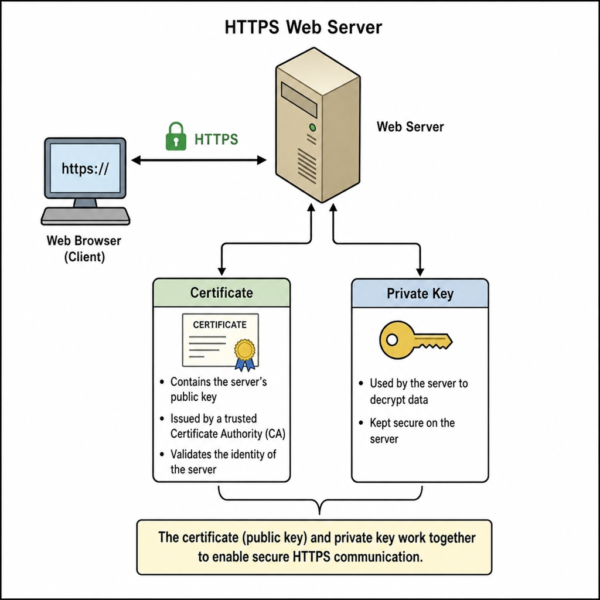
For a manual certificate request, your provider may ask for a certificate signing request, or CSR. Keep the matching private key private: the certificate can be shared, but the key needs restricted access. (httpd.apache.org)
Step 4: Install the certificate using the appropriate route
The answer to how to upload SSL certificate to website hosting is not “put it in the public files folder.” Installation means assigning the certificate and matching key to the service handling HTTPS. Follow the route below that matches your environment. (docs.cpanel.net)
Installation through a hosting control panel
In cPanel, certificate installation is available through the SSL/TLS interface. Other hosting dashboards use their own labels and workflows, so follow your provider’s instructions rather than assuming every panel looks identical. (docs.cpanel.net)
For a manual cPanel installation:
- Open SSL/TLS and locate the website certificate installation area.
- Select the domain you want to secure.
- Supply the certificate and its matching private key.
- Add the certificate authority bundle when required.
- Install the certificate, then test the domain over HTTPS.
Use the designated certificate fields, not the website’s media uploader or public document directory. Keep the private key protected throughout the process. (docs.cpanel.net)
Installation on a self-managed server
For supported Apache or NGINX installations, Certbot can obtain a certificate and modify server configuration. Its certonly mode obtains the files without installing them—a useful distinction when you need to install an HTTPS certificate through a separate deployment process. (eff-certbot.readthedocs.io)
If you need to install an SSL cert manually, understanding how to configure an SSL certificate means knowing where the server expects its files:
- Apache: Enable SSL for the HTTPS virtual host and configure SSLCertificateFile and SSLCertificateKeyFile.
- NGINX: Configure an HTTPS listener with listen 443 ssl, then set ssl_certificate and ssl_certificate_key.
- Certificate chain: Supply the required intermediates in the format and order your server expects.
These are configuration pointers, not complete server configurations. Preserve existing site settings and consult the documentation for your environment before applying changes. (httpd.apache.org)
Step 5: Verify HTTPS before redirecting visitors
Knowing how to apply an SSL certificate to a website includes checking what visitors actually receive. Open each covered hostname over HTTPS and inspect the browser’s certificate information. Confirm the expected domain coverage, validity period, and trusted certificate chain; investigate warnings rather than bypassing them. (docs.cpanel.net)
Next, check representative pages and essential journeys: login, contact forms, checkout, and embedded content. An HTTPS page can still request HTTP resources, creating mixed content that browsers may upgrade or block. Use browser developer tools to identify insecure requests, then update their source URLs or replace resources that lack HTTPS support. (developer.mozilla.org)
Once HTTPS works, implement permanent server-side redirects from HTTP to the corresponding HTTPS pages. Preserve page paths instead of sending every request to the homepage, and update internal links, canonical URLs, and sitemaps to the HTTPS versions. These are part of Google’s recommended migration practices. (developers.google.com)
How do you keep the certificate working after installation?
Keep the certificate working by automating renewal, ensuring renewed certificates are deployed, and monitoring the certificate your website actually serves. Renewal is not finished merely because new files exist: the serving software must use them. Certbot supports renewal workflows and deployment hooks for this purpose. (eff-certbot.readthedocs.io)
For Certbot-managed installations, use certbot renew –dry-run to test renewal. For managed hosting, confirm who handles failures and where notifications go. Recheck the process after hosting moves, DNS changes, or configuration changes that could affect validation. (eff-certbot.readthedocs.io)
The practical takeaway: treat HTTPS as an ongoing service, not a one-time upload. Choose the right installation route, verify real pages, and make renewal ownership explicit.