This tutorial assumes that you already have a multisite setup with mapped domains (domain1.com, domain2.com, etc.,) using WordPress MU domain mapping plugin. To make it much more clear, WordPress Multisite allows sub-domain or sub-directory based network sites setup, however mapping of domains refers to pointing of different domain names to each sub site of multisite network using domain mapping plugin.
In this tutorial, We will be installing free SSL certificate provided by Let’s Encrypt® (open certificate authority) , you are free to use SSL certificate from any certificate authority unless you have SSL certificate for each of mapped domain name.
Technical Requirements:
- Linux server
- Apache
- SSH / Command line access with root privileges
- Your server should have SNI support (Server Name Indication)
1. Generate SSL certificate for each mapped domain of multisite network
First of all, you will need SSL certificates generated for each of domain you have mapped. We have a very handy WordPress plugin to make this SSL generate job very easier “WP Encryption“. Buying an SSL certificate for each domain of your network would cost several $$$ each year, if you have large ecommerce sites or membership portals in your multisite network – We would highly recommend purchasing premium standard SSL certificates from one of premium SSL providers out there.
On the other hand, you could make use of free SSL certificates provided by Let’s Encrypt® using WP Encryption plugin as a mechanism to generate and auto renew SSL certificates easily in one click without any need of technical knowledge. Support for mapped domains is offered in “WP Encryption Pro” version (You might need 3 sites / 50 sites license based on number of sites you have). It’s an one time upgrade and lifetime SSL solution.
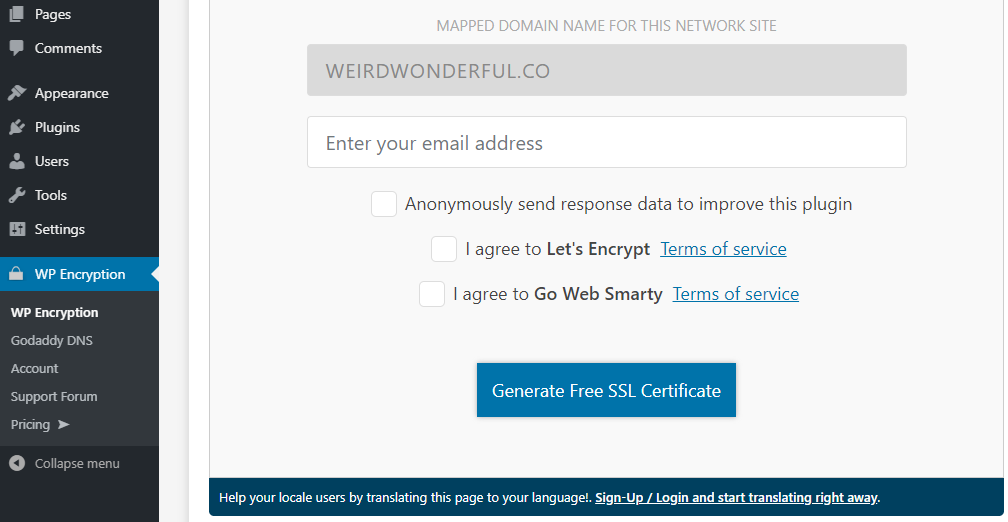
Upload the WP Encryption Pro plugin via your network -> plugins. Activate the plugin in each individual site (instead of network activation) and enter your license key to activate the premium features. WP Encryption Pro will auto detect your main site & sub-sites and generate SSL certificate accordingly. You will need to open WP Encryption page in your WP-Admin of each site, enter your email address and click on Generate SSL Certificate button.
You will notice a message in response log of WP Encryption saying Certificate for ‘yourdomain.com’ saved. Required SSL certificate files certificate.crt and private.pem will be generated & stored in keys/ folder inside your WordPress directory (in case of main site). For sub sites, it will auto create a separate folder (keys/domain2.com/) inside keys/ folder and store the certificate.crt and private.pem inside it.
2. Install SSL for main site of your multisite network
First, We will go through the process of modifying the apache config file of your server to enable SSL for main site. Note that this config modifications are just one time process & you don’t need to do it again in future. The required certificate.crt and private.pem files for this main site will be stored directly inside keys/ folder as stated above.
Connect via SSH / Command line and navigate to /etc/apache2/sites-enabled/ using below SSH command
cd /etc/apache2/sites-enabledRun ls -la to see list of files inside this directory. You should notice a file similar to default-ssl.conf, ssl.conf, etc., We will need to modify this config file to set correct SSL paths. Please run the below command to start the editor:
sudo nano default-ssl.confEnter root password if prompted. You should notice a <VirtualHost></VirtualHost> config block similar to below one
<VirtualHost _default_:443>
                ServerAdmin webmaster@localhost
                ServerName example.com
                DocumentRoot /var/www/html

                ErrorLog ${APACHE_LOG_DIR}/error.log
                CustomLog ${APACHE_LOG_DIR}/access.log combined

                #   SSL Engine Switch:
                #   Enable/Disable SSL for this virtual host.
                SSLEngine on

                #   SSLCertificateFile directive is needed.
               SSLCertificateFile      /etc/ssl/certs/ssl-cert-snakeoil.pem
               SSLCertificateKeyFile /etc/ssl/private/ssl-cert-snakeoil.key

                <FilesMatch "\.(cgi|shtml|phtml|php)$">
                                SSLOptions +StdEnvVars
                </FilesMatch>
                <Directory /usr/lib/cgi-bin>
                                SSLOptions +StdEnvVars
                </Directory>
</VirtualHost>
You might find the above VirtualHost block much more bigger & it doesn’t need to be same as above. Out of the above block, you only need to focus on 4 lines i.e., ServerName, DocumentRoot, SSLCertificateFile, SSLCertificateKeyFile. Modify these 4 lines based on below instructions:
- ServerName yourdomain.com
- DocumentRoot should point to your WordPress directory, this will be /var/www/html most of the time on an apache server.
- SSLCertificateFile should point to certificate.crt file inside keys dir Ex: /var/www/html/keys/certificate.crt
- SSLCertificateKeyFile should point to private.pem file inside keys dir Ex: /var/www/html/keys/private.pem
Once after you correct these 4 lines, press CTRL + O to save the changes, CTRL + X to exit file editor and restart apache server once using below command
sudo service apache2 restartNow open your main site with https:// protocol and you should see Let’s Encrypt valid certificate while clicking on padlock in browser address bar which means you have perfectly configured SSL for your main site.

3. Install SSL for sub sites / mapped domains
This process will be very similar to above changes except minor differences. CD into /etc/apache2/sites-enabled and sudo nano default-ssl.conf again.
Now you will need to replicate the <VirtualHost></VirtualHost> block one below another for each mapped domain and correct the 4 lines as stated above. The only difference is the SSL certificate & key paths will be inside sub-directory inside keys/ folder. An example replication for mapped domain2.com would look like below:
<VirtualHost _default_:443>
                ServerAdmin webmaster@localhost
       ServerName maindomain.com
       DocumentRoot /var/www/html

                ErrorLog ${APACHE_LOG_DIR}/error.log
                CustomLog ${APACHE_LOG_DIR}/access.log combined

                #   SSL Engine Switch:
                #   Enable/Disable SSL for this virtual host.
                SSLEngine on

                #   SSLCertificateFile directive is needed.
       SSLCertificateFile      /var/www/html/keys/certificate.crt
       SSLCertificateKeyFile /var/www/html/keys/private.pem

                <FilesMatch "\.(cgi|shtml|phtml|php)$">
                                SSLOptions +StdEnvVars
                </FilesMatch>
                <Directory /usr/lib/cgi-bin>
                                SSLOptions +StdEnvVars
                </Directory>
</VirtualHost>

<VirtualHost _default_:443>
                ServerAdmin webmaster@localhost
      ServerName domain2.com
      DocumentRoot /var/www/html

                ErrorLog ${APACHE_LOG_DIR}/error.log
                CustomLog ${APACHE_LOG_DIR}/access.log combined

                #   SSL Engine Switch:
                #   Enable/Disable SSL for this virtual host.
                SSLEngine on

                #   SSLCertificateFile directive is needed.
      SSLCertificateFile    /var/www/html/keys/domain2.com/certificate.crt
      SSLCertificateKeyFile /var/www/html/keys/domain2.com/private.pem

                <FilesMatch "\.(cgi|shtml|phtml|php)$">
                                SSLOptions +StdEnvVars
                </FilesMatch>
                <Directory /usr/lib/cgi-bin>
                                SSLOptions +StdEnvVars
                </Directory>
</VirtualHost>
Finally, You are all set with the config changes and just need to restart server once for config changes to take effect.
sudo service apache2 restartNow make sure a valid certificate exists for all your mapped domains by accessing the https:// version of them. Once after everything looks perfect, You can change site & admin url of all mapped domains to https:// protocol and enable “Force HTTPS” feature of WP Encryption if you notice any mixed content warnings in browser console.
We tried to be as transparent as possible so please excuse for a lengthy explanation.