This tutorial demonstrates how to install Let’s Encrypt® (open certificate authority) SSL certificate for your Bitnami WordPress as well as AWS Lightsail WordPress. If you wish to use some premium SSL certificate you have purchased, feel free to upload it to a secure folder on your server and skip to step 2 below.
Technical Requirements:
- Bitnami WordPress
- SSH / Command line access with root privileges
1. Generate free SSL certificate provided by Let’s Encrypt®
To keep this very simple, We will make use of a WordPress plugin “WP Encryption” to generate free SSL certificate in one click.
All you need to do is just install & activate the plugin on your WordPress Admin, navigate to WP Encryption page, enter your email address and click on Generate SSL Certificate button.
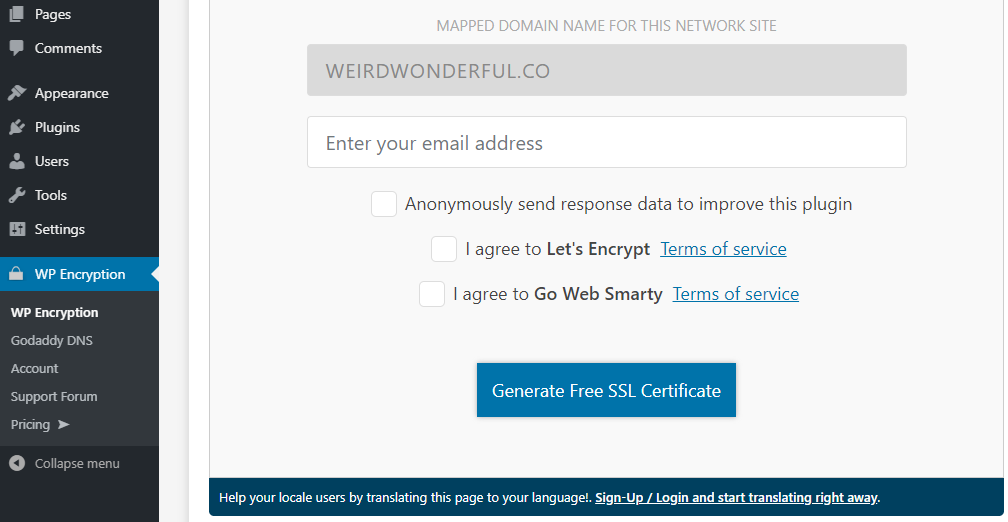
This process will request and retrieve free SSL certificate from Let’s Encrypt authority for your domain. SSL certificates provided by Let’s Encrypt authority will expire in 90 days and you will need to re-generate new certificates again using the same process before the expiry date. SSL certificates cost you several $$$ a year, You could upgrade to “WP Encryption Pro” to avail auto renew feature and lifetime SSL mechanism. The required certificate.crt and private.pem files will be generated and stored in keys/ folder inside your WordPress directory.
2. Configure Bitnami to use SSL certificates by Let’s Encrypt®
Assuming you are on a default setup of Bitnami / AWS Lightsail WordPress, You will need to configure the server config file to use SSL certificate and key from correct path. This is an one time process and you don’t ever need to do it again.
Solution 1
Create a symbolic link from existing / current SSL certificate to new SSL certificates generated & stored by WP Encryption plugin. You can do so by connecting via SSH / Command line to your server and run the below SSH commands,
For Latest Bitnami:
If you are using latest bitnami instance where your WordPress site files are located in /opt/bitnami/wordpress/ folder,
cd /opt/bitnami/apache/conf/bitnami/certs

sudo ln -sf /opt/bitnami/wordpress/keys/certificate.crt server.crt

sudo ln -sf /opt/bitnami/wordpress/keys/private.pem server.key

sudo /opt/bitnami/ctlscript.sh restart apache
For Older Bitnami:
If you are using older bitnami instance where your WordPress site files are located in /opt/bitnami/apps/wordpress/htdocs/ folder, please use below commands instead of above,
cd /opt/bitnami/apache2/conf
sudo ln -sf /opt/bitnami/apps/wordpress/htdocs/keys/certificate.crt server.crt
sudo ln -sf /opt/bitnami/apps/wordpress/htdocs/keys/private.pem server.key
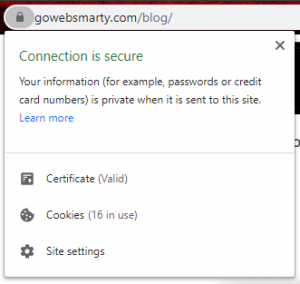
sudo /opt/bitnami/ctlscript.sh restart apacheFinally, Open your site with https:// protocol and check if valid certificate exists as below. If so, you are all set so please skip solution 2.
Solution 2
If the above symlink method fail, We will need to modify WordPress hosts config to use SSL certificates from correct path. Please login via SSH / Command line and follow the below procedure:
Latest Bitnami:
cd /opt/bitnami/apache2/conf/vhosts/

sudo nano wordpress-https-vhost.conf
Older Bitnami:
cd /opt/bitnami/apps/wordpress/conf/

sudo nano httpd-vhosts.conf
You will find a VirtualHost block similar to below
<VirtualHost *:443>
    ServerName yourserverdomain.com
    ServerAlias *.yourserverdomain.com
    DocumentRoot "/opt/bitnami/apps/wordpress/htdocs"

    SSLEngine on

  SSLCertificateFile "/opt/bitnami/apps/wordpress/conf/certs/new_server.crt"
  SSLCertificateKeyFile "/opt/bitnami/apps/wordpress/conf/certs/new_server.key"

    Include "/opt/bitnami/apps/wordpress/conf/httpd-app.conf"
</VirtualHost>
All you need to modify here are the SSLCertificateFile and SSLCertificateKeyFile lines as below
Latest Bitnami:
SSLCertificateFile "/opt/bitnami/wordpress/keys/certificate.crt"

SSLCertificateKeyFile "/opt/bitnami/wordpress/keys/private.pem"
Older Bitnami:
SSLCertificateFile "/opt/bitnami/apps/wordpress/htdocs/keys/certificate.crt"

SSLCertificateKeyFile "/opt/bitnami/apps/wordpress/htdocs/keys/private.pem"
After making these changes, press CTRL + O to save the changes and CTRL + X to exit the file editor. Now We will need to include this httpd-vhosts config file in main config file of Bitnami, please run below commands
NOTE: Skip to restart command below if you are on Latest Bitnami server.
cd /opt/bitnami/apache2/conf/bitnami/

sudo nano bitnami-apps-vhosts.conf
This will open Bitnami vhosts file editor, at the very bottom of the file add the below line in a new line
Include "/opt/bitnami/apps/wordpress/conf/httpd-vhosts.conf"After making these changes, press CTRL + O to save the changes and CTRL + X to exit the file editor. Lastly, restart Bitnami for changes to take effect using below command
sudo /opt/bitnami/ctlscript.sh restartEither one of the above two solutions would definitely succeed with the SSL setup for your Bitnami WordPress. Once after you see a valid SSL certificate accessing the https:// version of your site, please change the site & admin url to https:// via Settings -> General of WP-Admin and also enable “Force HTTPS” feature of WP Encryption plugin interface if you notice any mixed content warning in browser console.
3. Resolving Intermediate Cert (CA) issue in Bitnami WordPress
Facebook share debugger and SSLLabs might show your SSL intermediate certificate is missing. Please follow the below commands to resolve the issue:
Latest Bitnami:
cd /opt/bitnami/apache2/conf/bitnami
sudo nano bitnami-ssl.conf
Older Bitnami:
cd /opt/bitnami/apache2/conf/bitnami
sudo nano bitnami.conf
Add below line just after SSLCertificateKeyFile line
Latest Bitnami:
SSLCACertificateFile "/opt/bitnami/wordpress/keys/cabundle.crt"Older Bitnami:
SSLCACertificateFile "/opt/bitnami/apps/wordpress/htdocs/keys/cabundle.crt"After making these changes, press CTRL + O to save the changes and CTRL + X to exit the file editor. Lastly, restart Bitnami Apache for changes to take effect using below command
sudo /opt/bitnami/ctlscript.sh restart apache